www.gt4dc.co.uk
Maintain, Modify and DRIVE your GT-Four


It is currently Sat Apr 27, 2024 9:54 am


Post new topic Reply to topic  [ 28 posts ]  Go to page 1, 2  Next
Author Message
PostPosted: Fri Aug 16, 2013 10:07 pm 
Offline
Group N

Joined: Mon Oct 24, 2005 3:21 pm
Posts: 347
Car Model: None
Bit of a catch up but here's the last 2 weeks of our lives condensed in to 1 post:

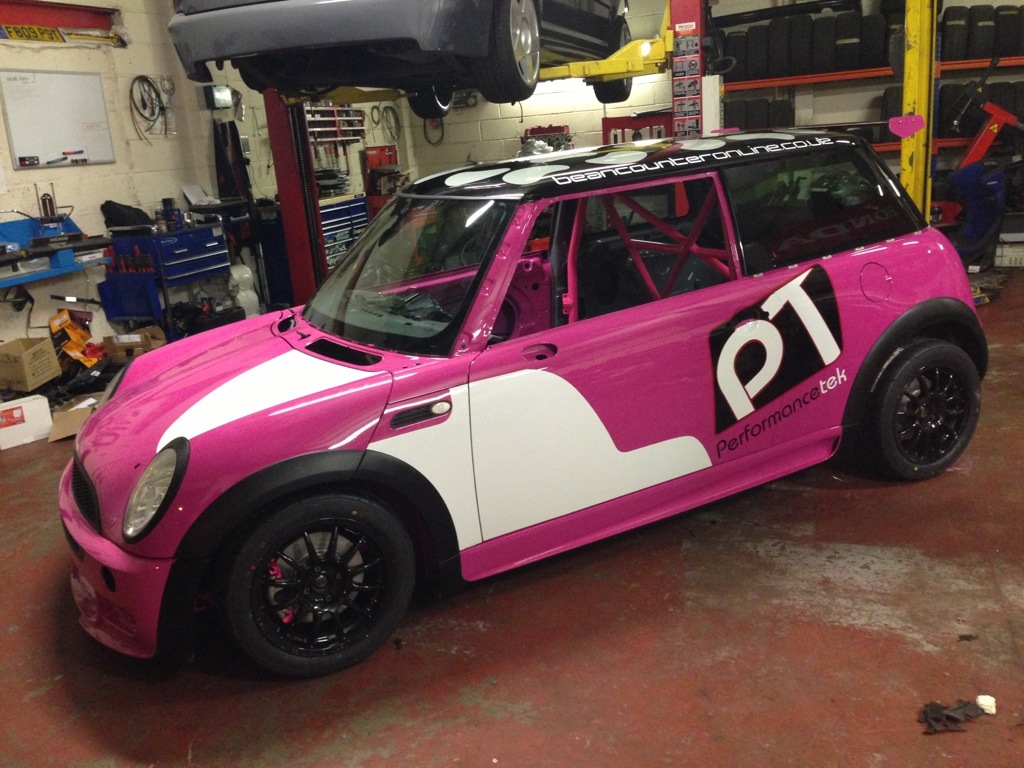
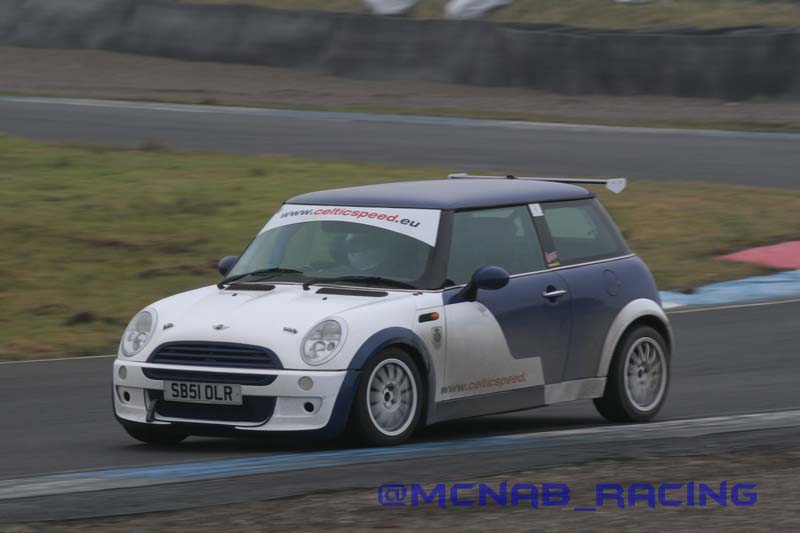
So this year I've been helping my mate who bought Alan Waugh's MINI.

Taking on running it ourselves along with Gerry from PerformanceTek, the first couple of rounds were spent ironing out faults and fixing things that came up. Crapping a gearbox at round 1 wasn't ideal but ESK loaned us a box to get the car back out. Round 2 the car managed to bend a rear strut (must have been the car, driver protests his innocence :lol: )

Image


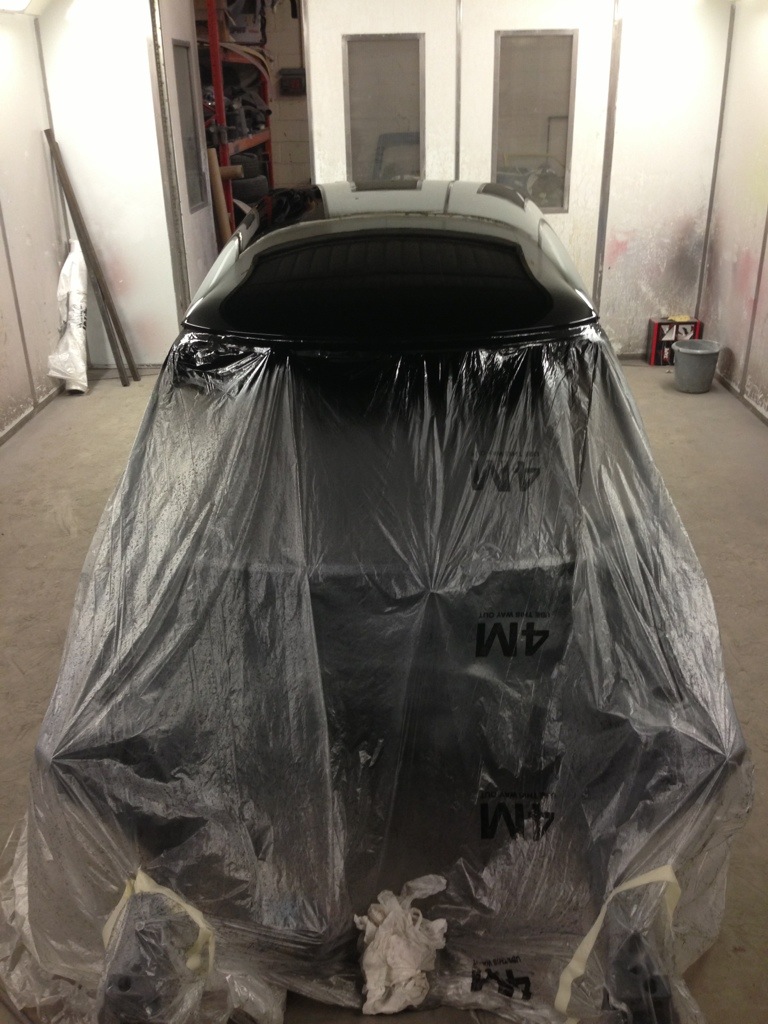
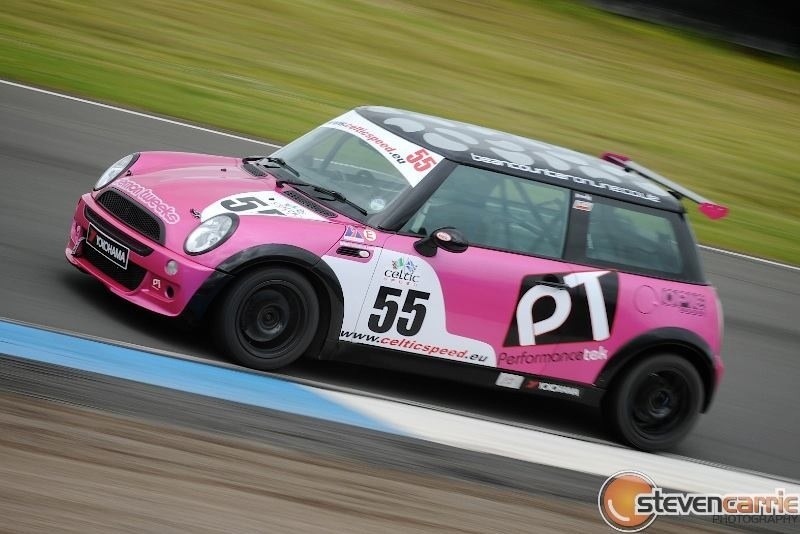
The damper couldn't be repaired in time for Oulton Park so we missed that round and gave her a fresh paint job and general tidy up

Image


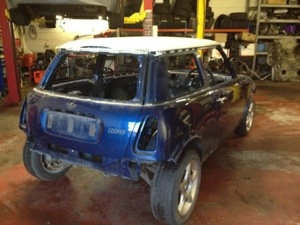
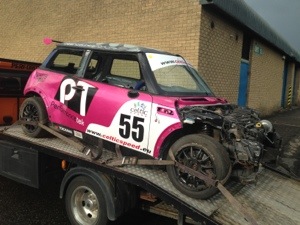
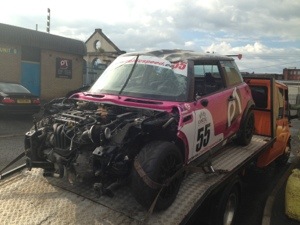
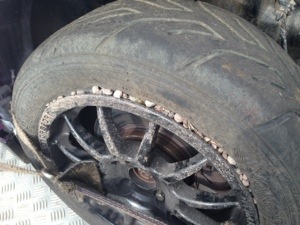
Then it all went a bit wrong on a tracknight at Knockhill...

Image

Image

Image

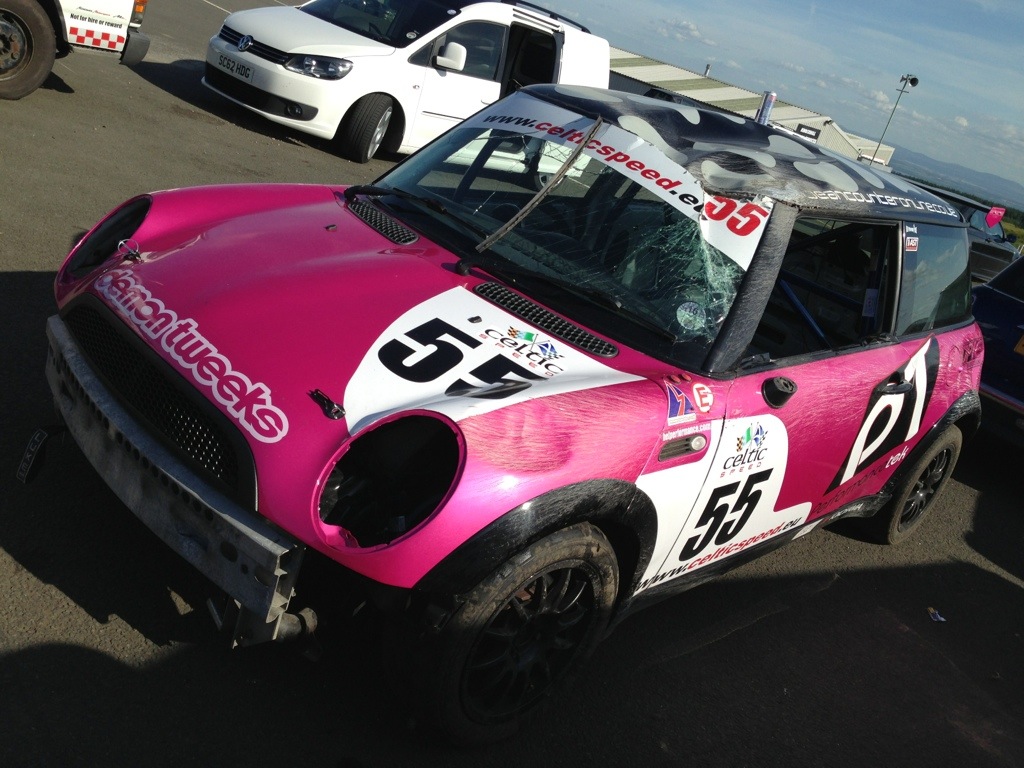
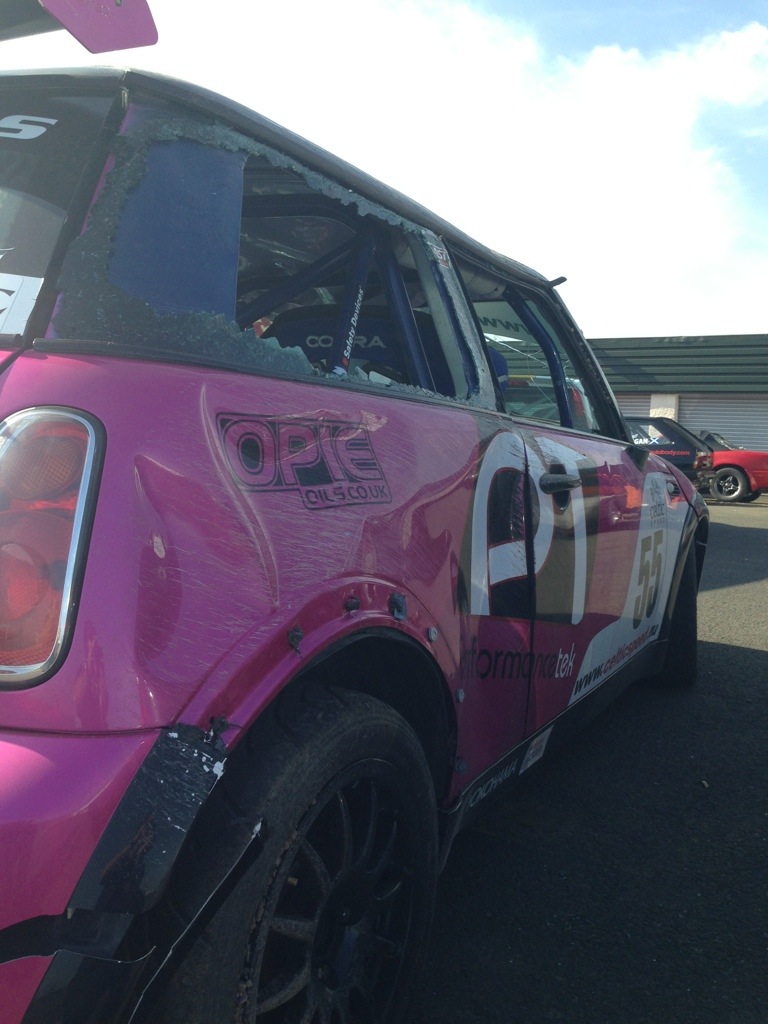
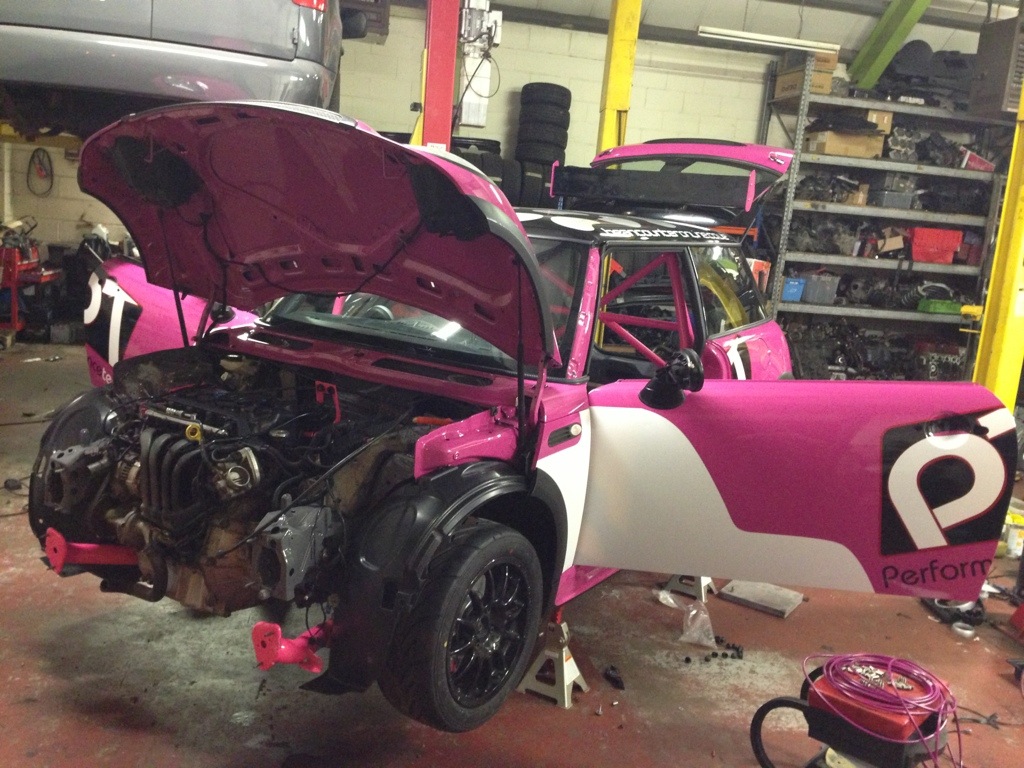
Although initially the damage didn't look that bad, the car has had a roof replaced following a previous roll. With low weight one of this cars bonuses filling the quarters with cataloy wasn't highly desirable either. So new roof, bonnet, bootlid, rear bumper, doors, osr quarter, nsr quarter would have been the shopping list. Then we spotted the tunnel was kinked. Game over for this shell.


Stage one of the re-shell is well under way, although the cars are limited in modifications there's still a lot of prep work required before it can be rebuilt.

Image Image

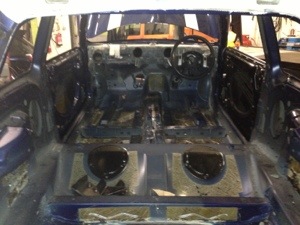
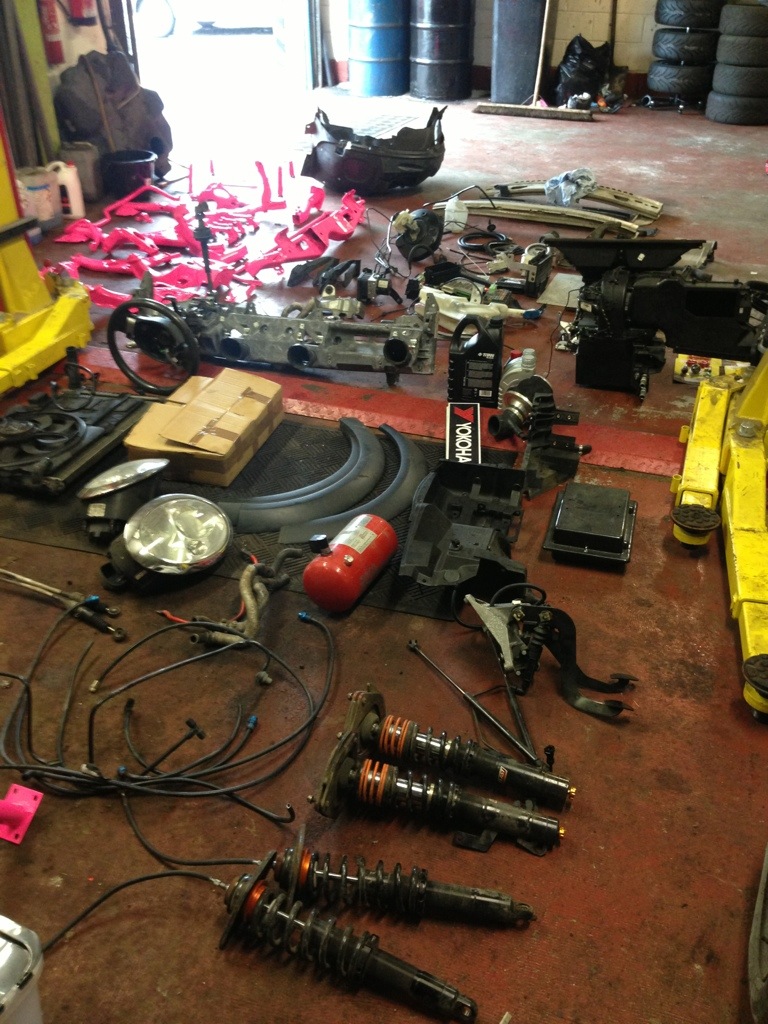
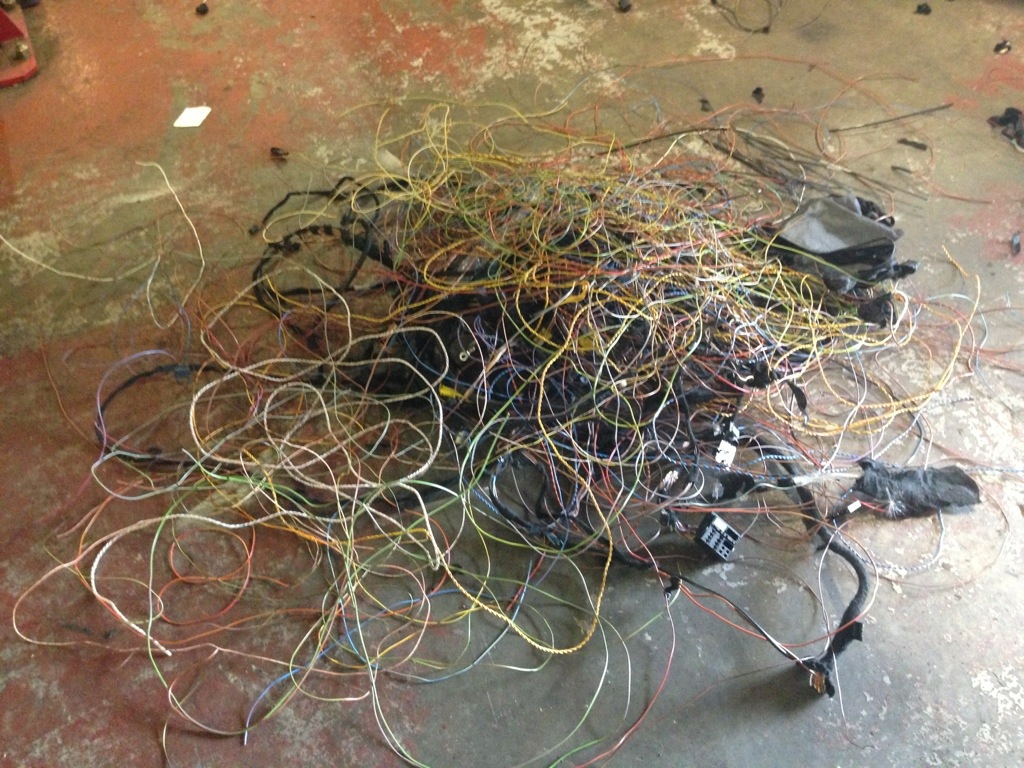
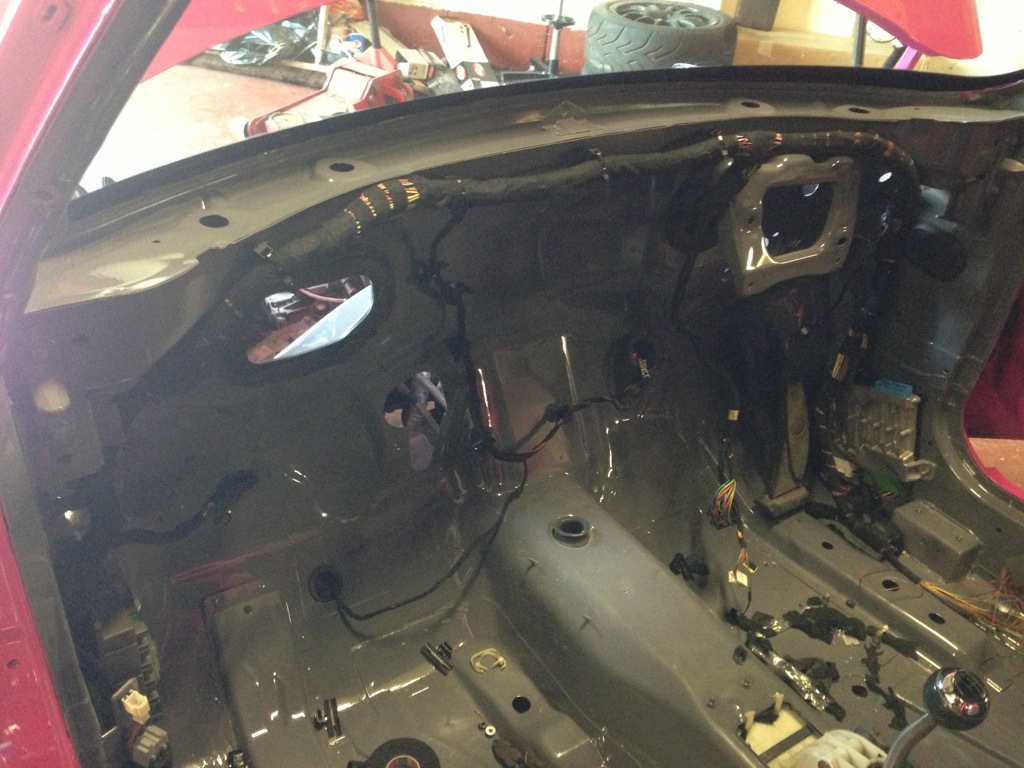
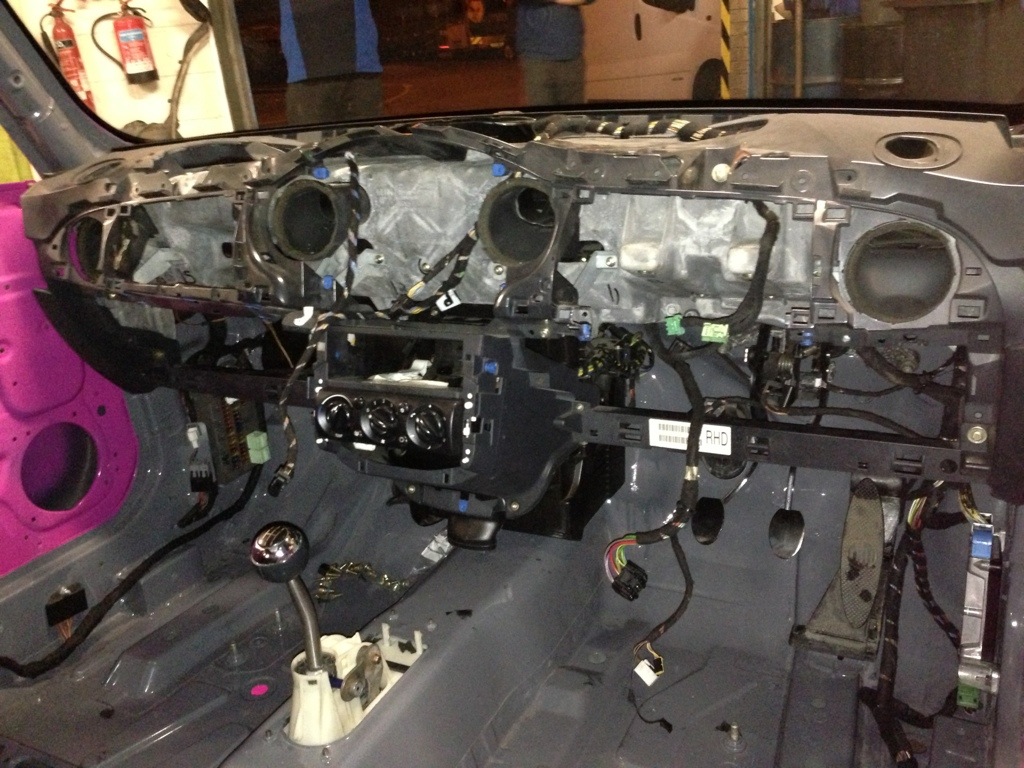
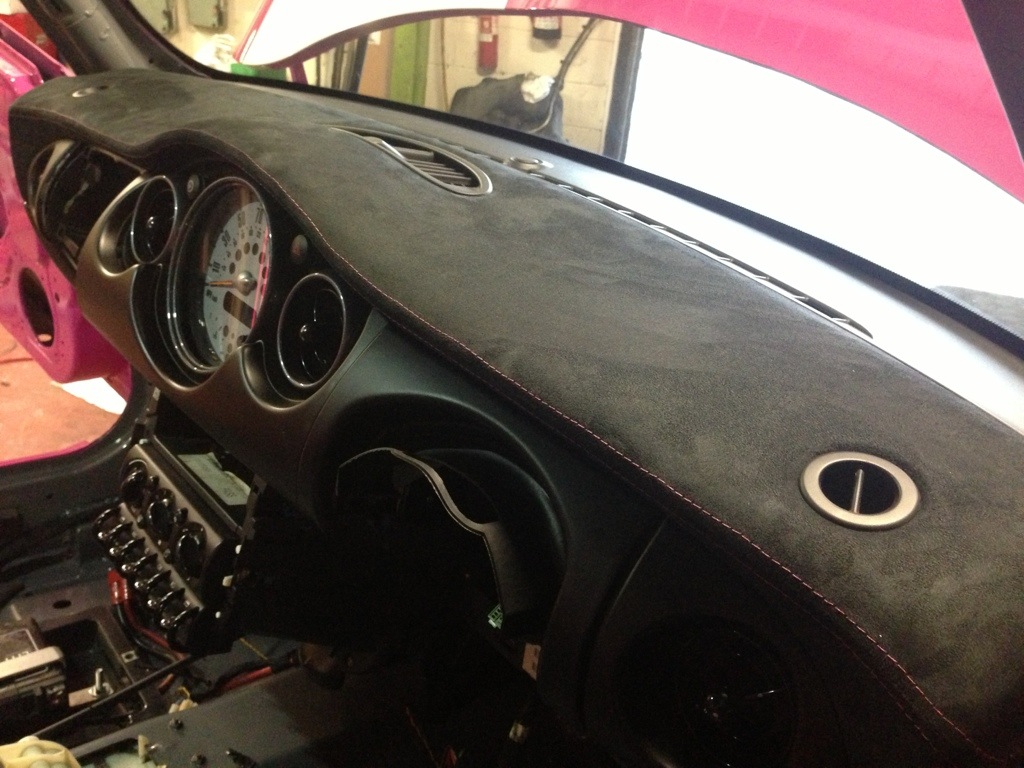
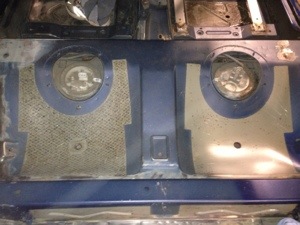
After stripping the entire interior including wiring harness, engine and running gear and all windows from the car, we brought it back to base and got to work on the sound deadening material and superfluous bracketry.

Image Image


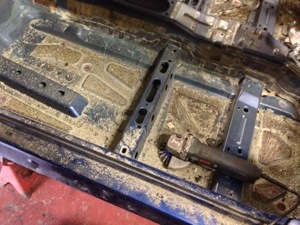
Even though the bulk of the weight is in items like the seats and carpets, there's a good few kilos in the sound deadening and it tends to be everywhere you don't want weight in the car. Additionally, there's bordering on a metric ton of seam sealer liberally splattered all over the inside of the car. Although not a huge weight saving, it looks unsightly if left in place and every kilo helps! Here's a before and after of the tunnel.

Image Image


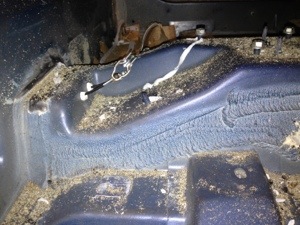
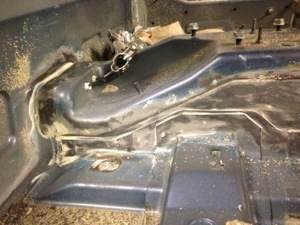
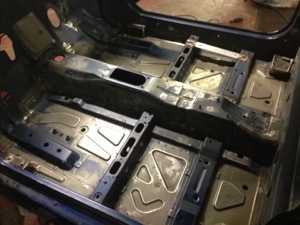
With all the sound deadening and sealant removed its almost time to weld the new cage mounts in to the blue shell. Roughly 3kg of seam sealer in total removed [don’t know an exact figure, we blew a load of it out with the airline the first night] in addition to the adhesive goo the roof insulation was stuck on with and the random bits of foam bonded plastic in the rear quarters.

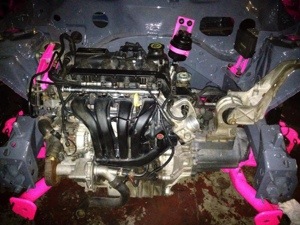
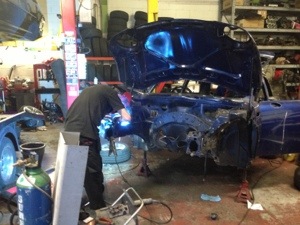
Meanwhile Alicia has been brought back down from race HQ for final stripping and removal of the engine and box.

ImageImage

ImageImage


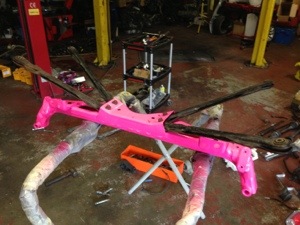
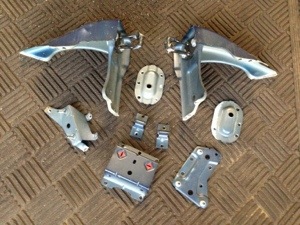
So seam sealer ground out, we got the chassis legs welded as per the regulations. With the punishment the cars take over the kerbs the legs can start to flex slightly and it only takes a few mm of flex to pop a driveshaft due to the location of the gearbox mounts.

Next up, the cage was offered up the floor plates tack welded in then the cage removed to allow seam welding.
Image Image

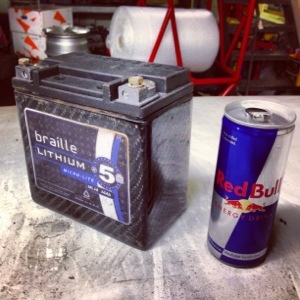
Whilst pulling apart the old car I actually had a proper look at the battery for the first time [never had cause to pull it out the batter box before hand]. It’s a Braille lithium ion unit, powers the car well enough to perform repeated starts yet weighs just 5lb / 2.2kg! That’s a standard 250ml can of RedBull I pictured it next to for a sense of scale…
Image


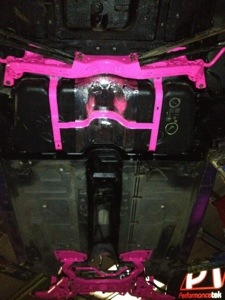
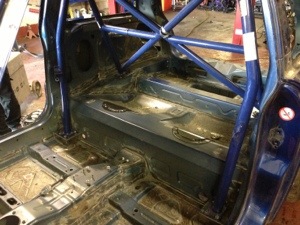
Cage brackets all welded in so last thing to do inside wise is prep for paint.

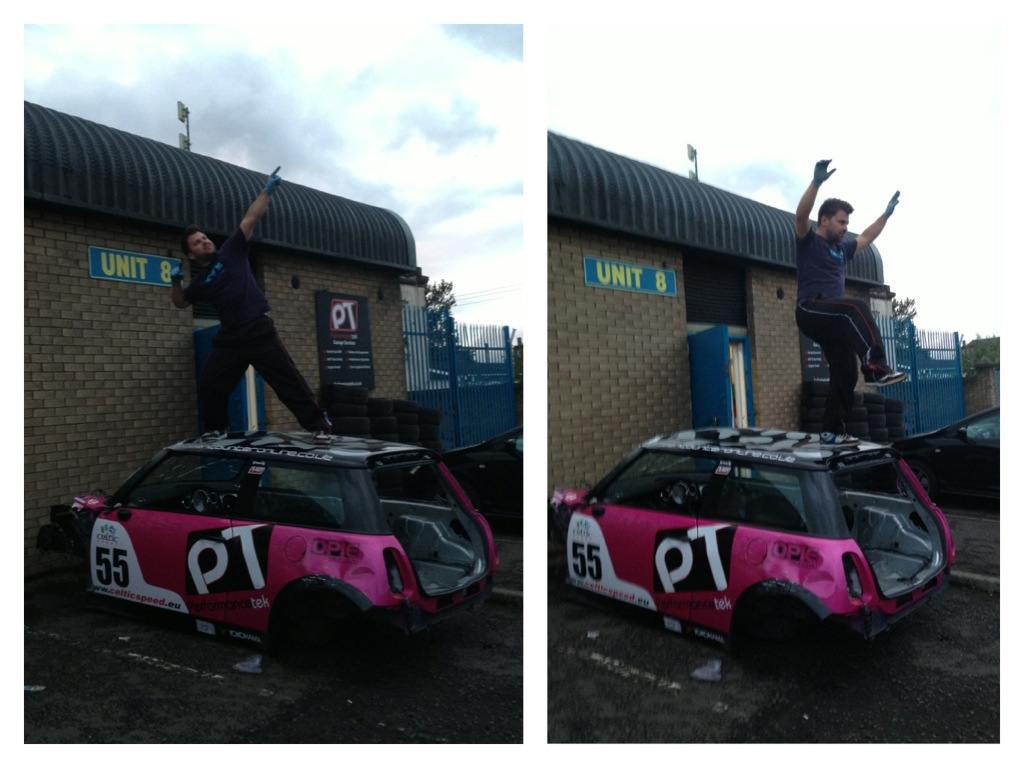
After taking some cliched poses on the old shell of course...
Image

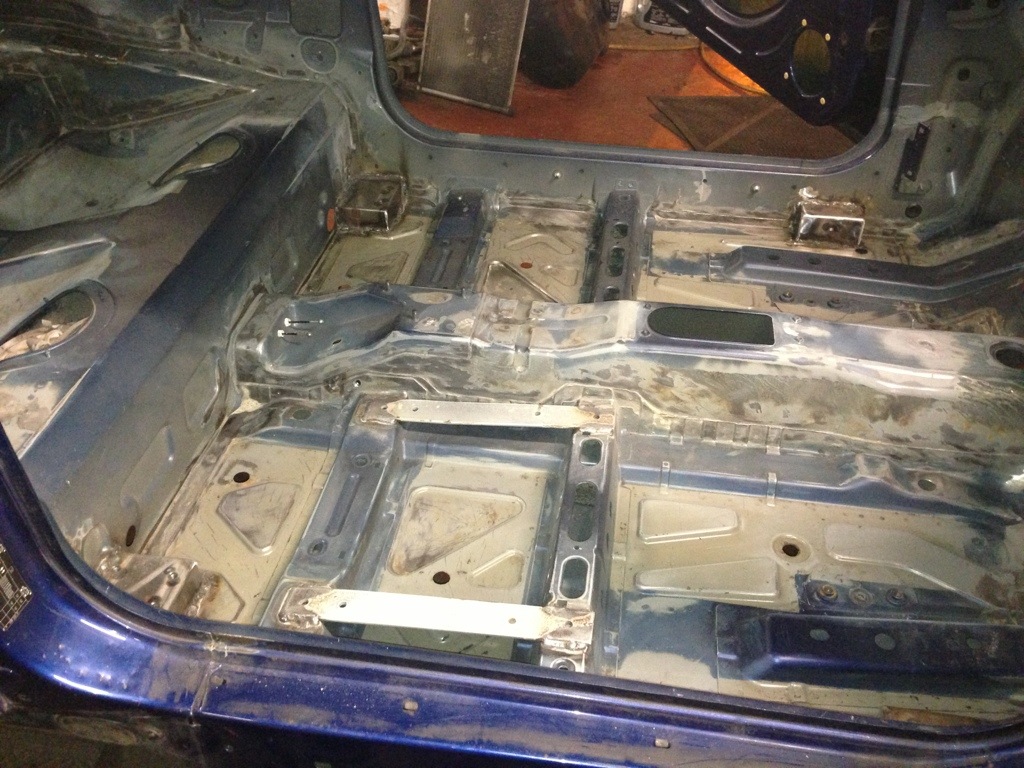
After removing the sound deadening you're always left with the residue, nothing for it but some old skool elbow grease.
ImageImage


Sanded, hoovered out and ready for primer
Image
Image


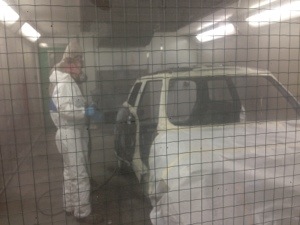
Interior spraying is go!

Immy and Kev at 
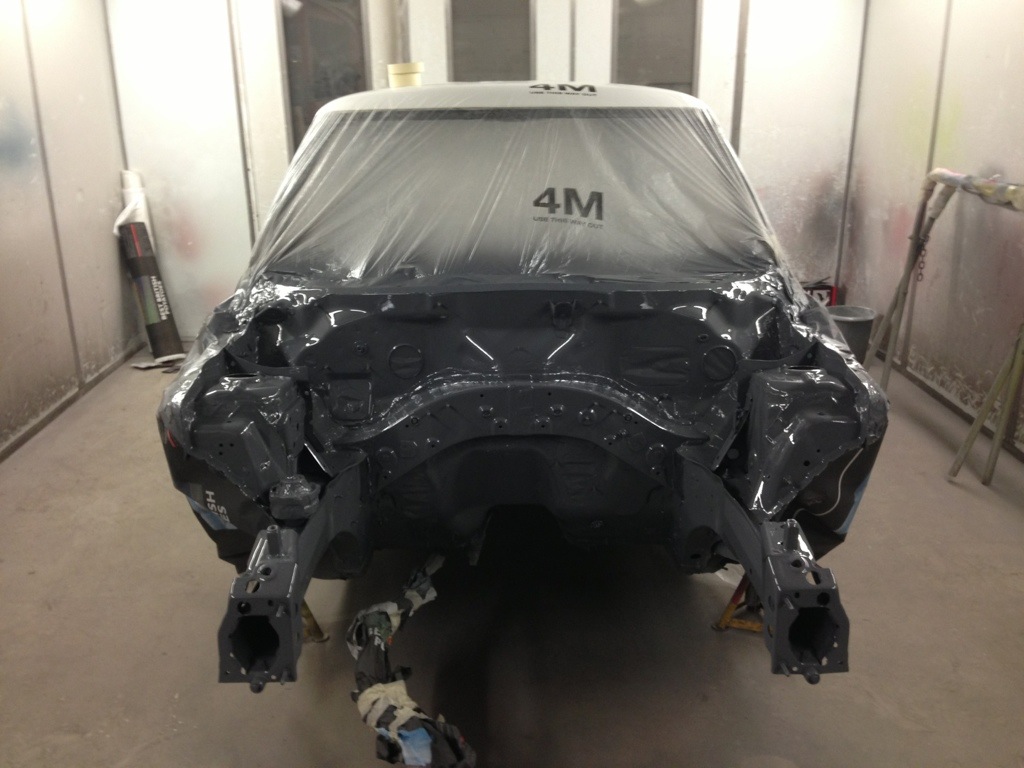
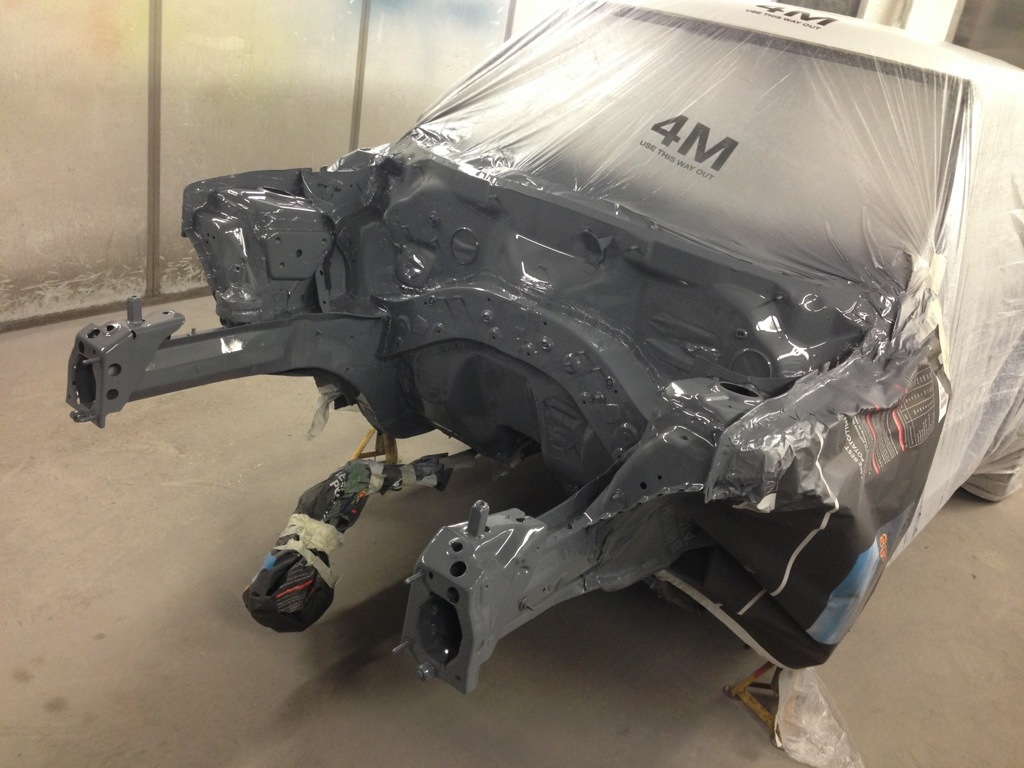
IA Bodyshop getting the primer on in the spray booth as I type.

Image


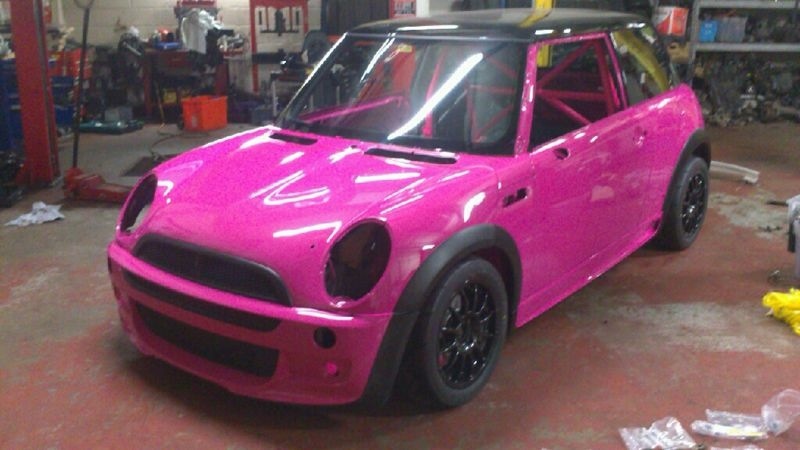
Now the interior is painted, it's time to prep the exterior.

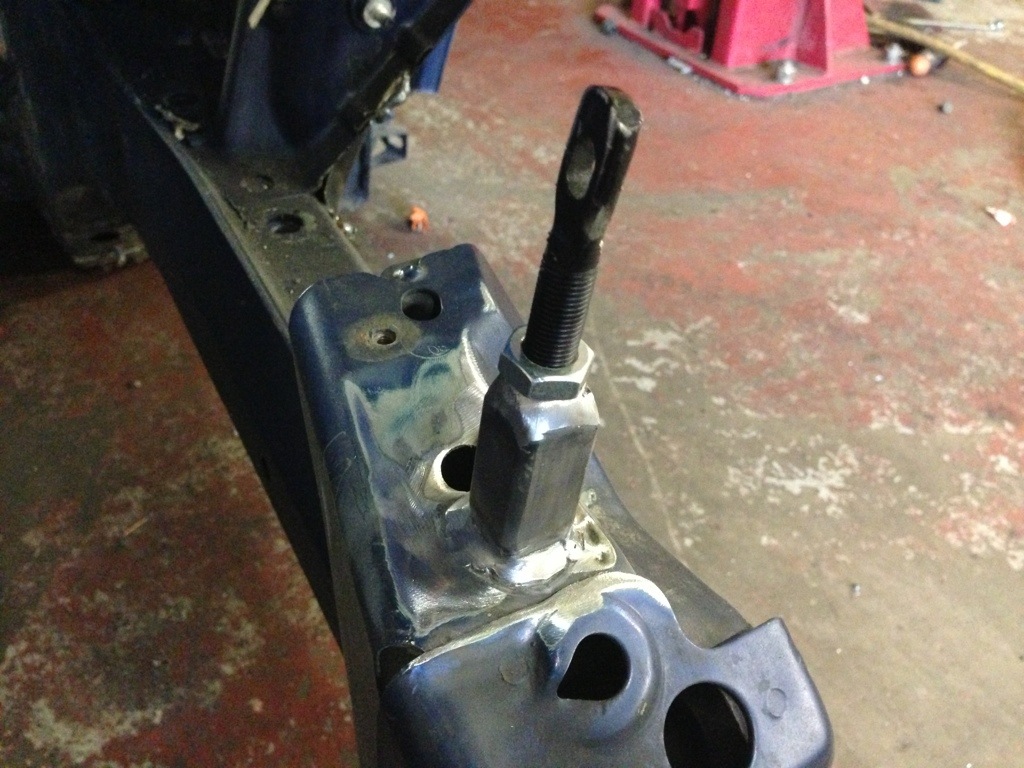
First up, boot and bonnet pins:

Image

Image

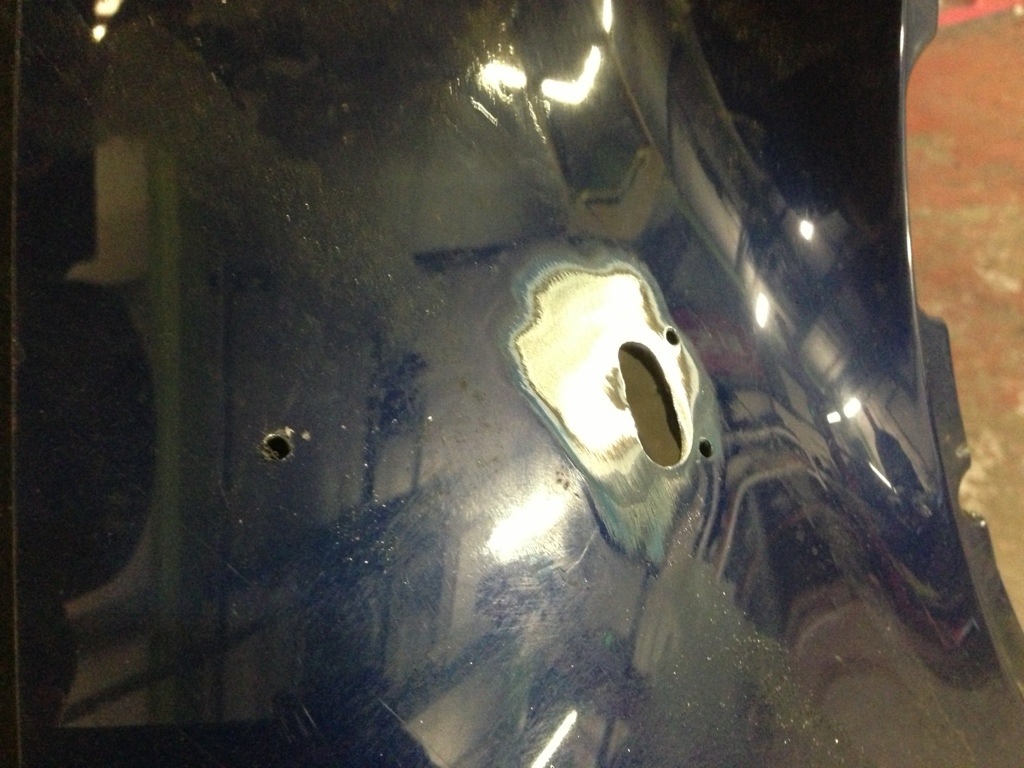
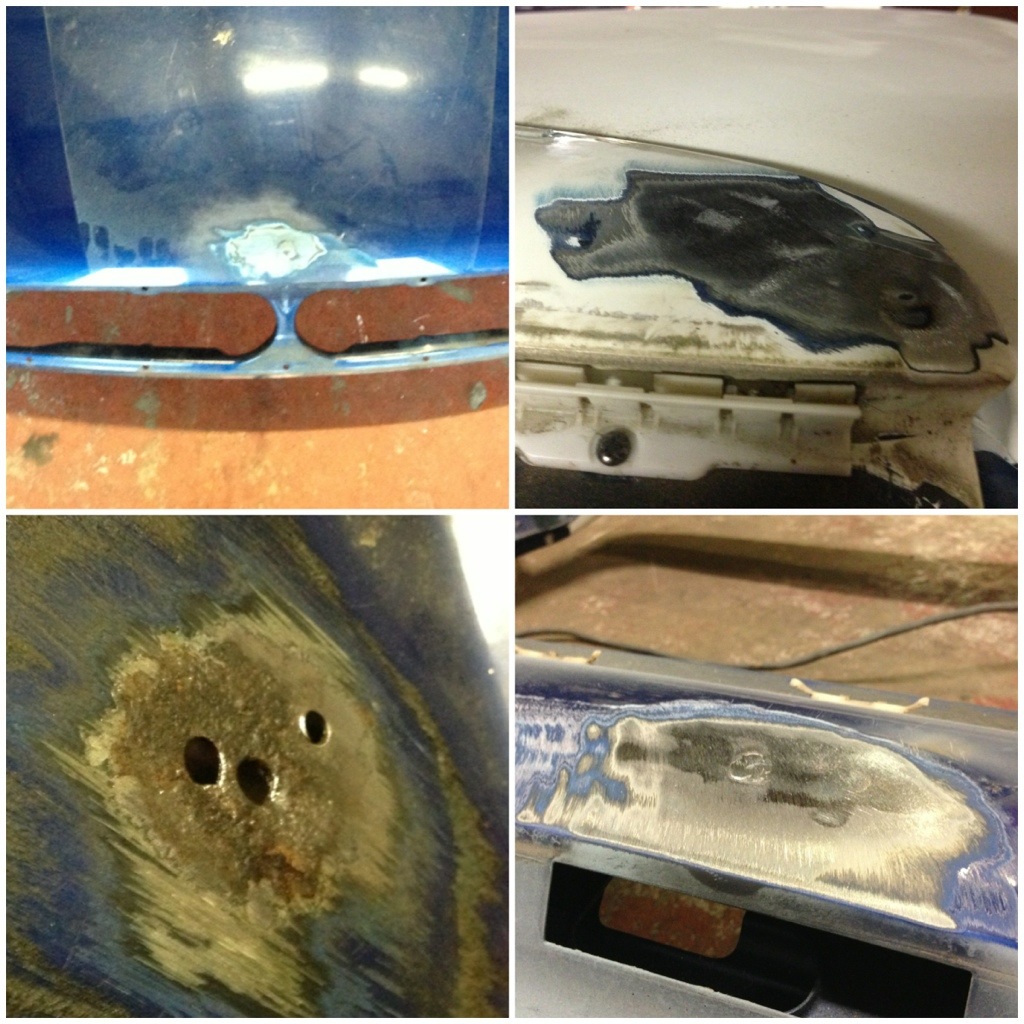
Also a good opportunity to take care of plugging the holes where the bonnet and boot badges came off, then plug the holes where the original boot spoiler was mounted and try and plug the holes where someone went to town with the self tapping screws trying to mount a number plate:

Image

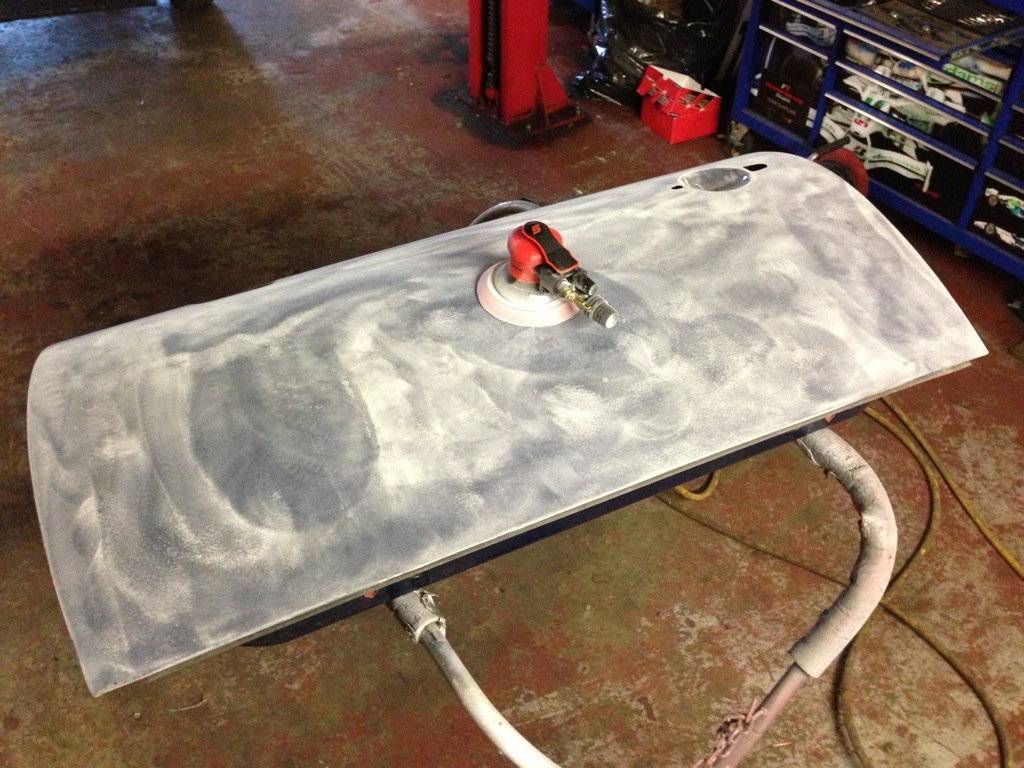
No escaping it, it's DA sander'o'clock:

Image

In the mean time, Hendy has been sanding down the engine bay where we can't attack with the DA and I've been getting in to the insides of the doors with some scotchbrite.


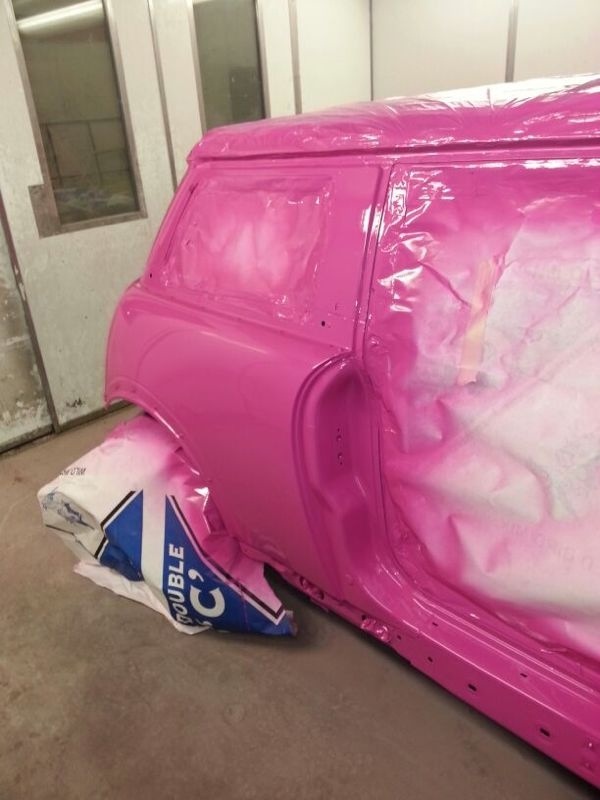
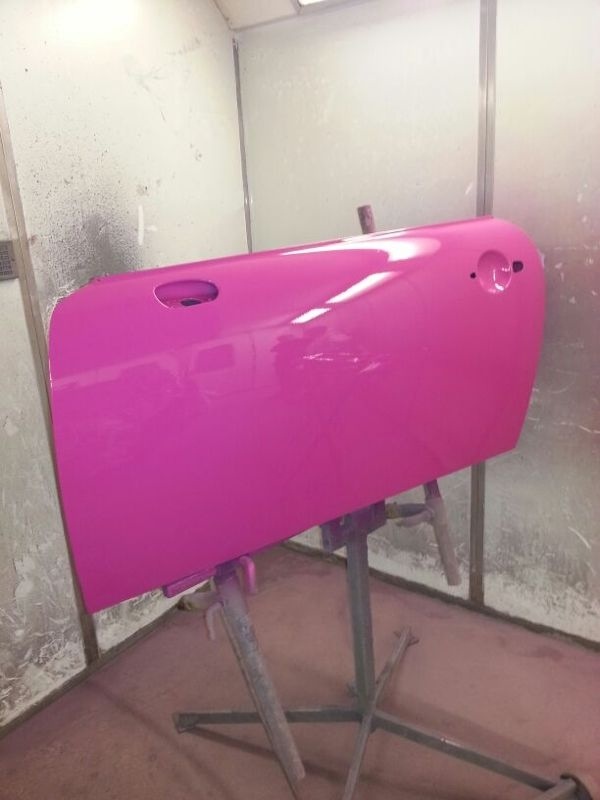
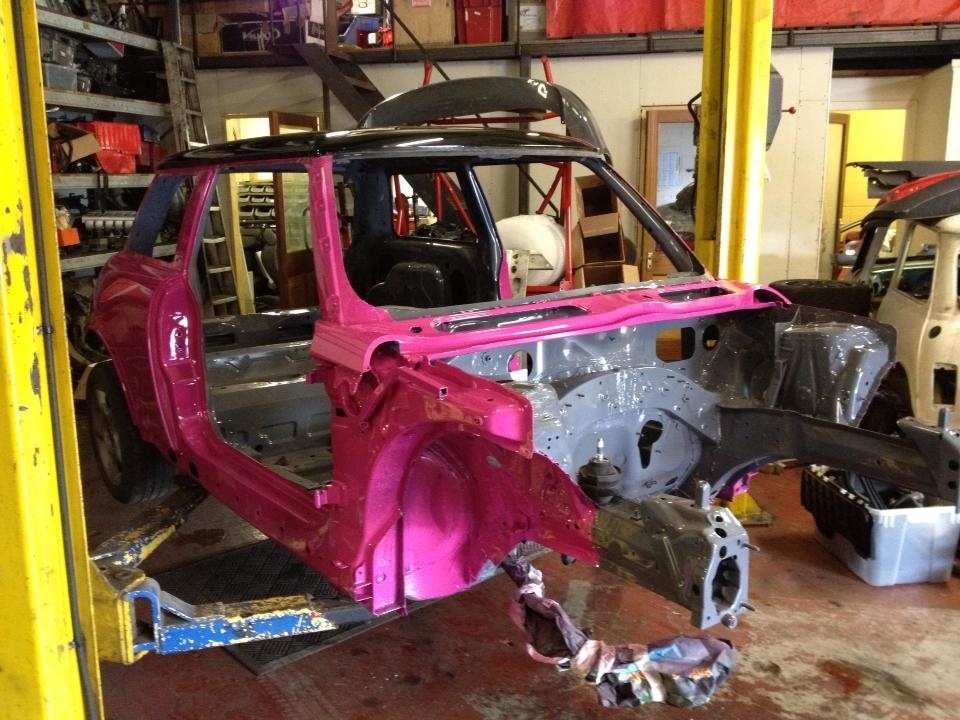
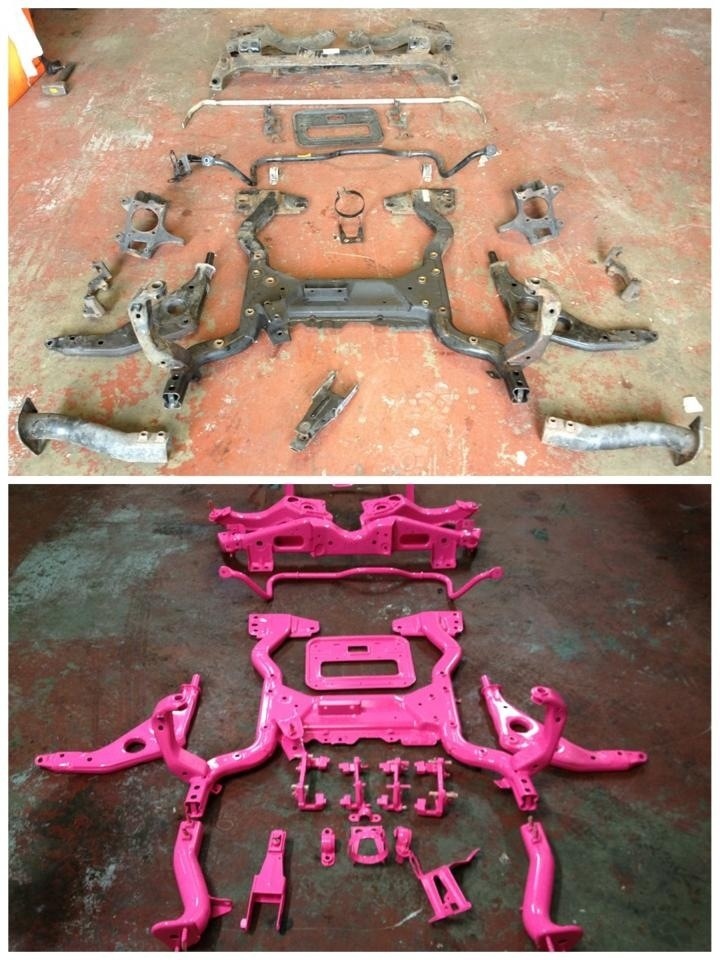
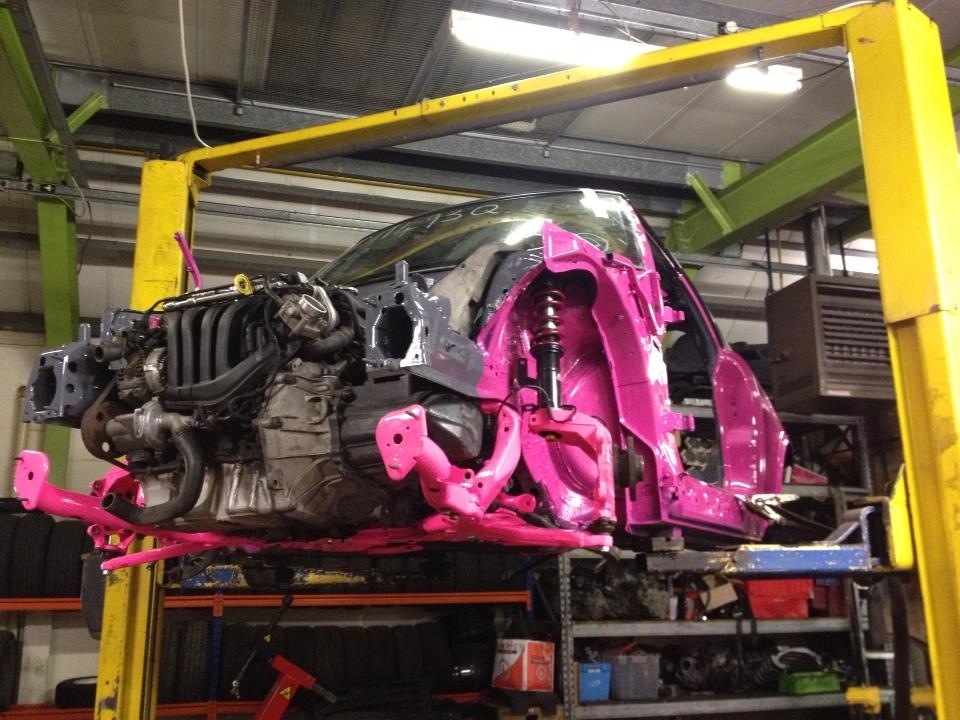
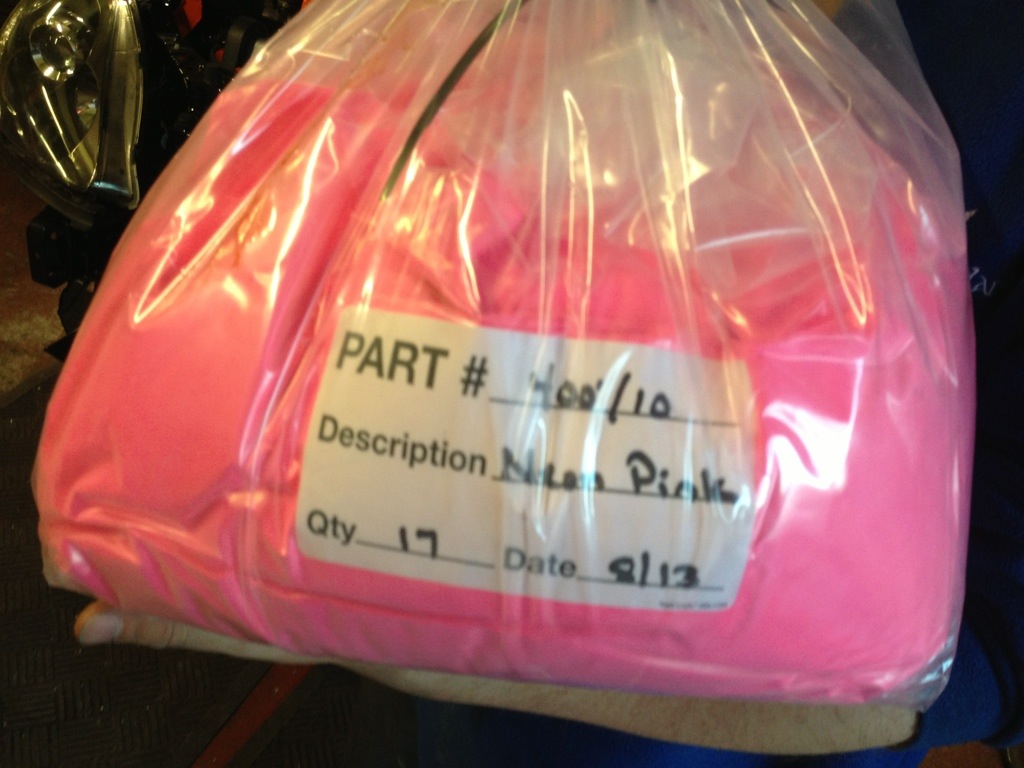
Either Scarface and Barbie are doing a collaboration, or that's our big bag of neon pink powder coat arrived from the USA...

Image


Kevs been a busy boy again. Engine bay finished up in paint tonight:

Image

Image


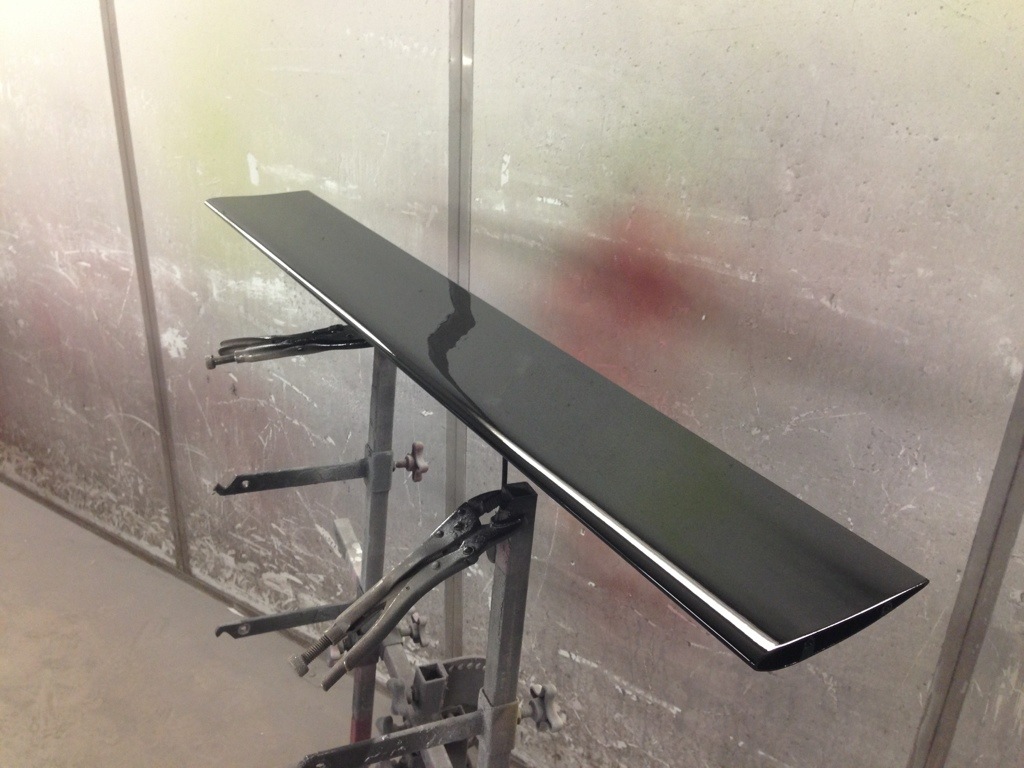
Whilst we've been flatting and preparing the bonnet, doors and bootlid tonight, Kev's painted the roof and wing blade.

Image

Image

_________________
02 Mini Cooper Race Car
94 ST205 Import
92 ST185 Carlos Sainz
www.mcnab-racing.co.uk


Top
 Profile  
 
PostPosted: Fri Aug 16, 2013 10:09 pm 
Offline
Group N

Joined: Mon Oct 24, 2005 3:21 pm
Posts: 347
Car Model: None
Think pink! No other words needed really...

Image

Image

Image


Just need to put it all together now!

Image


Alan and the guys at Chameleon Metal Coatings have been busy prepping all the subframes and suspension hardware:

Image

_________________
02 Mini Cooper Race Car
94 ST205 Import
92 ST185 Carlos Sainz
www.mcnab-racing.co.uk


Top
 Profile  
 
PostPosted: Fri Aug 16, 2013 10:33 pm 
Offline
Club Staff
User avatar

Joined: Wed Jul 13, 2005 12:14 am
Posts: 3265
Location: Camberley, Surrey
Car Model: ST205
Looks like a fine job Malcolm :)

_________________
GT4DC Events Co-ordinator
1996 ST205 UK


Top
 Profile  
 
PostPosted: Sat Aug 17, 2013 12:08 am 
Offline
Club Staff
User avatar

Joined: Wed Jul 13, 2005 12:06 am
Posts: 4743
Location: Perth, Western Australia
Car Model: ST205
Wow, was that the new driver running out of talent or the coach? :lol:

I've always wondered what would be involved in re-shelling. Were you able to re-use the Safety Device cage? It all looks very expensive.

Lets hope that the remainder of the season sees the lap times drop without further dramas.

_________________
Don
GT4DC Chairman
1994 Toyota Celica GT-Four ST205WRC JDM 269bhp @ 0.9bar
1994 Toyota Celica GT-Four Special GT 590bhp @ 1.8bar
1989 Van Diemen RF88/89 Formula Ford 1600
2008 Nissan Patrol GU 3.0L ZD30DDTi 154bhp


Top
 Profile  
 
PostPosted: Sat Aug 17, 2013 12:16 am 
Offline
Group N

Joined: Mon Oct 24, 2005 3:21 pm
Posts: 347
Car Model: None
I was on a plane 30k feet above the North Sea when it happened so cant blame the coach :p

Driver had a head full of nonsense due to personal life drama and shouldnt have been behind the wheel. Cage was fine for re-use, theyre remarkably sturdy. This is my team mate's crash last year, cage was removed, inspected by MSA scrutineer and is now being used in another car:
http://www.youtube.com/watch?v=Tfl8cWXHNTU
http://www.youtube.com/watch?v=X9DXr-Sa8-k

_________________
02 Mini Cooper Race Car
94 ST205 Import
92 ST185 Carlos Sainz
www.mcnab-racing.co.uk


Top
 Profile  
 
PostPosted: Sat Aug 17, 2013 12:33 am 
Offline
Club Staff
User avatar

Joined: Wed Jul 13, 2005 12:06 am
Posts: 4743
Location: Perth, Western Australia
Car Model: ST205
Good to hear Malcolm!

Amazing the cage in the multi-roll shunt survived. Unlike these T45 cages used in WRC which seem to snap really easily.

_________________
Don
GT4DC Chairman
1994 Toyota Celica GT-Four ST205WRC JDM 269bhp @ 0.9bar
1994 Toyota Celica GT-Four Special GT 590bhp @ 1.8bar
1989 Van Diemen RF88/89 Formula Ford 1600
2008 Nissan Patrol GU 3.0L ZD30DDTi 154bhp


Top
 Profile  
 
PostPosted: Sun Aug 18, 2013 8:53 pm 
Offline
Group N

Joined: Mon Oct 24, 2005 3:21 pm
Posts: 347
Car Model: None
Parts assembled, body painted, time to rebuild!

Image

After using the old rear suspension so we could wheelbarrow the car about during paint we stripped that off to be replaced with the powder coated items.

The fuel tank got cleaned up and a fresh dose of heat reflective tape applied before the new tank bracket went on.

Image Image

Day 1 complete: front and rear subframes, engine and box installed

Image Image


Image

_________________
02 Mini Cooper Race Car
94 ST205 Import
92 ST185 Carlos Sainz
www.mcnab-racing.co.uk


Top
 Profile  
 
PostPosted: Sun Aug 18, 2013 10:07 pm 
Offline
Club Staff
User avatar

Joined: Wed Jul 13, 2005 12:14 am
Posts: 3265
Location: Camberley, Surrey
Car Model: ST205
That first photo is brilliant! :D

_________________
GT4DC Events Co-ordinator
1996 ST205 UK


Top
 Profile  
 
PostPosted: Mon Aug 19, 2013 9:47 am 
Offline
Group N

Joined: Mon Oct 24, 2005 3:21 pm
Posts: 347
Car Model: None
Sunday shift complete. Car is now rolling!

Image

Wiring and dash in next, then front section of the cage and seats etc.

_________________
02 Mini Cooper Race Car
94 ST205 Import
92 ST185 Carlos Sainz
www.mcnab-racing.co.uk


Top
 Profile  
 
PostPosted: Mon Aug 19, 2013 7:04 pm 
Offline
Group N

Joined: Mon Oct 24, 2005 3:21 pm
Posts: 347
Car Model: None
Loom pare back time at PerformanceTek! All the wiring no longer needed has been whipped out and the remaining loom is now being tesa taped oem style:

Image

Image

_________________
02 Mini Cooper Race Car
94 ST205 Import
92 ST185 Carlos Sainz
www.mcnab-racing.co.uk


Top
 Profile  
 
PostPosted: Mon Aug 19, 2013 9:24 pm 
Offline
Club Staff
User avatar

Joined: Wed Jul 13, 2005 12:06 am
Posts: 4743
Location: Perth, Western Australia
Car Model: ST205
So was this the loom out of the rolled shell that you are lightening or another loom out of the donor shell? Is the weight saving significant?

_________________
Don
GT4DC Chairman
1994 Toyota Celica GT-Four ST205WRC JDM 269bhp @ 0.9bar
1994 Toyota Celica GT-Four Special GT 590bhp @ 1.8bar
1989 Van Diemen RF88/89 Formula Ford 1600
2008 Nissan Patrol GU 3.0L ZD30DDTi 154bhp


Top
 Profile  
 
PostPosted: Mon Aug 19, 2013 9:37 pm 
Offline
Group N

Joined: Mon Oct 24, 2005 3:21 pm
Posts: 347
Car Model: None
This is out the donor, the original racecar's wiring loom was horrific.

Probably 2-3kg in that box, every little helps :)

_________________
02 Mini Cooper Race Car
94 ST205 Import
92 ST185 Carlos Sainz
www.mcnab-racing.co.uk


Top
 Profile  
 
PostPosted: Tue Aug 20, 2013 11:06 am 
Offline
Group N

Joined: Mon Oct 24, 2005 3:21 pm
Posts: 347
Car Model: None
With the wiring chopped out we can start to get the interior back in and push on towards the car going for alignment in 2 days.

So dash going back in:
Image

The engine bay is closer to being built back up now with the wiper mechanism, scuttle panel covers and various other brackets back in.

Liked this shot of the underside showing all the powder coated parts that replaced the donors corroded bits:

Image

Barry dropped round with some of the cars graphics to get a head start on applying them, one task that always takes waaaaaay longer than you hope/expect! Also brought some carbon treats to rid the car of the factory chrome!

Image
Image

_________________
02 Mini Cooper Race Car
94 ST205 Import
92 ST185 Carlos Sainz
www.mcnab-racing.co.uk


Top
 Profile  
 
PostPosted: Tue Aug 20, 2013 7:17 pm 
Offline
Club Staff
User avatar

Joined: Wed Jul 13, 2005 12:06 am
Posts: 4743
Location: Perth, Western Australia
Car Model: ST205
Looking racy!

_________________
Don
GT4DC Chairman
1994 Toyota Celica GT-Four ST205WRC JDM 269bhp @ 0.9bar
1994 Toyota Celica GT-Four Special GT 590bhp @ 1.8bar
1989 Van Diemen RF88/89 Formula Ford 1600
2008 Nissan Patrol GU 3.0L ZD30DDTi 154bhp


Top
 Profile  
 
PostPosted: Wed Aug 21, 2013 10:40 am 
Offline
Group N

Joined: Mon Oct 24, 2005 3:21 pm
Posts: 347
Car Model: None
Real time updates weren't happening last night as the cartek isolator fought like a demon! We got there in the end though!

Car back up on axle stands getting set about

Image

Arch liners back in and remaining trims and guttering back on, door and boot seals fitted and pins lined up.

Dash came together nicely:

Image

Main dash panels painted matt black and the top and lower panels trimmed in alcantara to reduce glare.

Image

Next task, new HEL brake lines to match the hoses already in place.

Image

_________________
02 Mini Cooper Race Car
94 ST205 Import
92 ST185 Carlos Sainz
www.mcnab-racing.co.uk


Top
 Profile  
 
Display posts from previous:  Sort by  
Post new topic Reply to topic  [ 28 posts ]  Go to page 1, 2  Next


Who is online

Users browsing this forum: No registered users and 115 guests


You cannot post new topics in this forum
You cannot reply to topics in this forum
You cannot edit your posts in this forum
You cannot delete your posts in this forum

Search for:
Jump to:  
cron
Powered by phpBB® Forum Software © phpBB Group